Guide
Tile Layout Patterns and How They Change Your Order
Common tile patterns, the industry offset and grout joint rules for large tile, centering a layout, and overage by pattern.
By the Yardwork editorial team · Published
The pattern you choose changes more than the look of a floor or wall. It decides how many tiles get cut, how much extra to buy, and, for large tiles, how far rows can be offset before the edges stop lining up. This guide covers the common patterns, the industry rules for offsets and grout joints, how to center a layout, and how to size your order with the tile calculator.
Common tile patterns
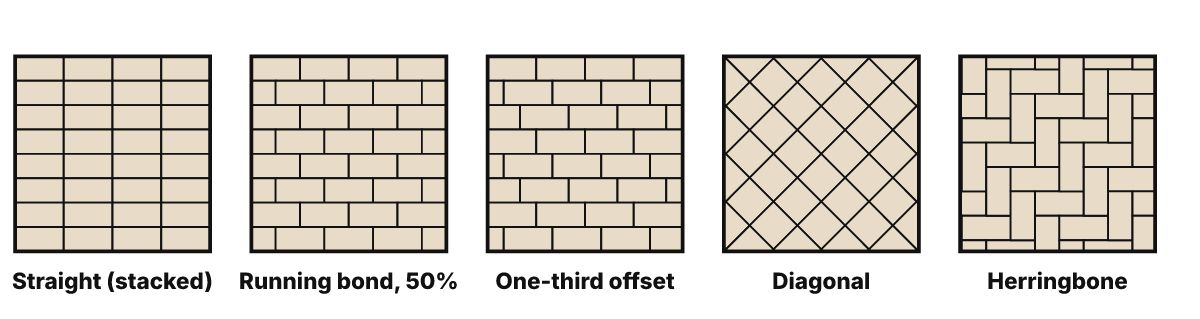
- Straight (stacked or grid). Joints line up in both directions. Cuts are only needed along the walls.
- Running bond (brick). Each row shifts by half a tile. Popular for rectangular tiles, but limited for long tiles (see below).
- One-third offset. Each row shifts by a third of the tile length, repeating every three rows.
- Diagonal. A straight grid turned 45°. Every tile along every wall is cut on an angle.
- Herringbone. Rectangles laid at right angles in a zigzag. Attractive, but the edges of the room are all angled cuts, and the layout needs careful planning from a center line.
Offsets for large tile
Long tiles are rarely perfectly flat. The Ceramic Tile Education Foundation (CTEF) describes “the inherent warpage on the long side of the tile” and explains the trouble with a half offset: “the high point in the center of the long side of the tile is placed very tightly next to the two low points abutting the tile ends.” The result is lippage, where one tile edge sits higher than its neighbor.
The installation standard addresses it directly. CTEF quotes ANSI A108.02 as published in the TCNA Handbook: for running bond and other offset patterns “where the side being offset is greater than 15” (nominal dimension), the offset pattern will be a maximum of 33% unless otherwise specified by the tile manufacturer.” A bigger offset needs the specifier and owner to approve a mock-up and the lippage it shows.
So for a 12 × 24 in tile laid with the long side offset, the limit is a third of 24 in, an 8 in step. CTEF also warns that a random plank layout can produce offsets between 33% and 50% by accident, so watch the joints as you go.
Grout joints in offset patterns
Tight joints make lippage worse, so the same standard sets minimum joints for running bond. As quoted by CTEF, for running bond with tile that has any side over 15 in, the joint should average at least:
| Tile type | What it means | Minimum average joint |
|---|---|---|
| Rectified | Edges mechanically finished to a precise size | 1/8 in + edge warpage |
| Calibrated (not rectified) | Sorted to the maker's size range | 3/16 in + edge warpage |
CTEF's example: a rectified tile with 1/32 in of edge warpage needs at least 1/8 + 1/32 = 5/32 in on average.
Centering the layout
Walls are rarely a whole number of tiles apart. If you start at one wall, the leftover lands at the other as a thin sliver that is hard to cut and looks like a mistake. Instead, mark a center line and lay out from it so the cuts at both walls match. There are two ways to sit the tiles on that line; work out both and pick the one with larger cuts.
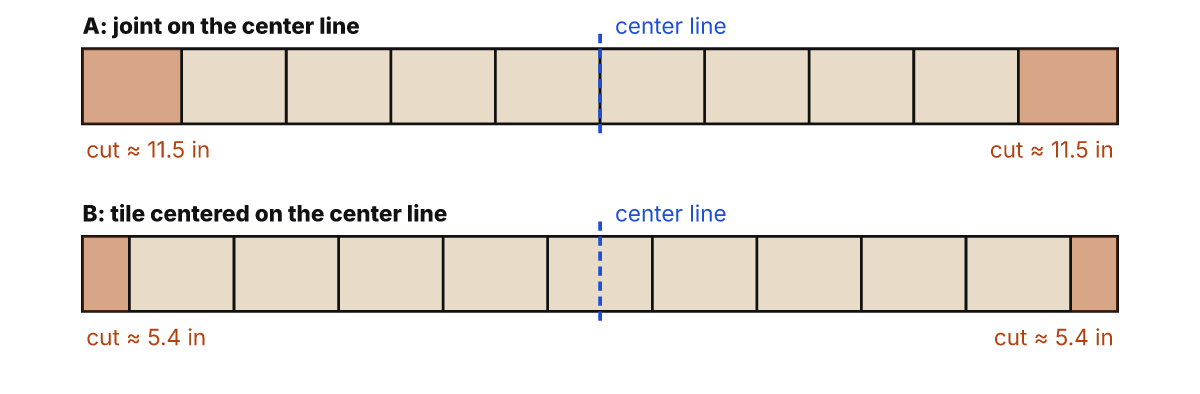
Pitch      = 12 + 1/8 = 12.125 in per row
A (joint)  = 60 − 4 × 12.125 = 11.5 in left at each wall
B (tile)   = 60 − 6.0625 − 4 × 12.125 = 5.44 in left at each wall
Option A wins here. Dry-lay a row in each direction before mixing any thinset. Rooms are rarely perfectly square, so measure every wall first, as described in how to measure a room.
How much extra tile to order
Every pattern turns some tiles into offcuts. Fireclay Tile, a tile maker, recommends “at least 15-20% overage” for its products, and “a minimum of 20%” for a pattern like herringbone “where more cuts will need to be made.” It also says to get the final number, overage included, from your installer, who can see your room's cuts.
The tile calculator takes the allowance as a percentage, so you can compare patterns quickly. Treat the manufacturer's figure for your tile as the starting point and adjust for the room: L-shapes, closets, and lots of doorways all add cuts. See measuring irregular areas for rooms that aren't rectangles.
Agree on the pattern before tiling
Most tile disputes are about expectations, not workmanship. CTEF tells installers to “always get written approval for the pattern being used and grout joint size, especially if edge warpage is an issue, BEFORE setting the tile,” and notes that this may mean “an installed and grouted sample (a mock-up).” It describes a well-installed random-joint plank floor that the owner rejected because nobody had agreed what the pattern would look like.
If you are hiring an installer, settle these in writing before the first tile goes down:
- The pattern and the offset (for example, one-third rather than half for long tiles).
- The grout joint width, and whether the tile is rectified or calibrated.
- Which way the long side runs, and where the layout is centered.
- The overage you are buying, and who keeps the spare tiles.
Photos of past jobs or the manufacturer's installation images help everyone see the same floor before it exists.
Worked example: 12 × 24 tile in a 12 × 10 ft room
A 12 × 10 ft floor in rectified 12 × 24 in tile with 1/8 in joints, laid in a one-third offset (an 8 in step). Compare a 15% overage with the 20% Fireclay suggests for herringbone:
Area          = 12 × 10 = 120 sq ft
Tile + joint  = (12 + 1/8) × (24 + 1/8) in = 2.0314 sq ft each
At 15%        = 138 sq ft ÷ 2.0314 = 67.93 → 68 tiles
At 20%        = 144 sq ft ÷ 2.0314 = 70.89 → 71 tiles
The difference is 3 tiles. Box counts vary by product, so enter yours in the tile calculator to round up to whole boxes, and use the square footage calculator for rooms made of several rectangles.
Frequently asked questions
What offset should I use for 12 × 24 tile?
ANSI A108.02, as quoted by the Ceramic Tile Education Foundation, limits the offset to 33% when the side being offset is longer than 15 in, unless the tile maker specifies otherwise. On a 24 in tile, 33% is an 8 in step.
Why do some sources say the offset rule starts at 18 inches?
A 2017 CTEF tile tip quoted an earlier version of ANSI A108.02 with an 18 in threshold. CTEF's 2025 article quotes the current wording, which applies above 15 in. Follow the current standard and your tile maker's instructions.
Can I lay large tile in a 50% brick pattern?
Only if the tile manufacturer allows it, or if the specifier and owner approve a mock-up and the resulting lippage. The 33% limit exists because long tiles are slightly warped, and a 50% offset puts a high point next to two low ends.
How much extra tile do I need for herringbone?
Fireclay Tile recommends at least 20% overage for herringbone and similar patterns with more cuts, and at least 15–20% in general, for its tiles. Ask your installer to confirm the number for your tile and room.
What grout joint width do large tiles need?
For running bond with any side longer than 15 in, ANSI A108.02 as quoted by CTEF calls for an average of at least 1/8 in for rectified tile and 3/16 in for calibrated tile, widened by the edge warpage of the tiles.
Related calculators and guides
Calculators
- Tile Calculator — Tiles and whole boxes for a floor or wall from the area, tile size, grout joint, waste allowance, and the count or coverage on the box.
- Square Footage Calculator — Total area in square feet, square meters, square yards, and acres from rectangles, triangles, circles, and trapezoids, minus cut-outs.
Guides
- How to Measure an Irregular Area — Split odd shapes into rectangles, triangles, circles, and trapezoids, then average width and depth.
- How to Measure a Room for Paint and Drywall — Measure each wall and ceiling, subtract openings, handle gables, slopes, and stairwells, and keep it all on one sheet.
Sources
- Offsets, Grout Joints and Customer Expectations (May 2025) — Ceramic Tile Education Foundation. Used for: Offset ≤ 33% where the side being offset is > 15 in nominal, unless the tile maker specifies otherwise; running bond with any side > 15 in: average joint ≥ 1/8 in (rectified) or ≥ 3/16 in (calibrated), plus edge warpage. Checked 2026-10-05.
- CTEF Tile Tip: Be Clear with Customer About Grout Joint Offsets (June 2017) — Stone World. Used for: Earlier wording: maximum 33% offset where the side being offset is greater than 18 in. Checked 2026-10-05.
- Tile School: Doing the Math — Fireclay Tile. Used for: At least 15–20% overage; at least 20% for herringbone and similar patterns with more cuts. Checked 2026-10-05.